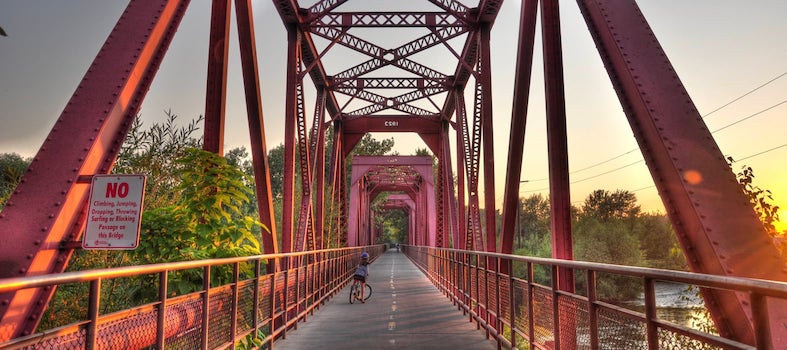
Project 2 Earthquakes and Boise River Bridge
A Project-based STEM+Computing Inquiry
About
This project was supported by the National Science Foundation (NSF) under Grant Number 1640228. Any opinions, findings, conclusions, or recommendations expressed in this project are those of the author(s) and do not necessarily reflect the views of the National Science Foundation. If you have any questions, please contact Dr. Dazhi Yang at dazhiyang@boisestate.edu or use our Contact Form.
Description
This project-based scientific inquiry project: Earthquake and Boise River Bridge Design is centered on researching different types of bridges, various aspects of earthquakes, and seismic safety features of bridges. In this project, students work in small groups to explore different bridge types, the destructive aspects of an earthquake, and the safety features for bridges that could resist earthquakes. Then students will design an earthquake-tolerant bridge and test their design with an earthquake simulator. To develop computational thinking and an understanding of STEM subjects, students from 4th, 5th and 6th grade will work in small groups of six, with one in-service teacher and one pre-service teacher, twice a week for eight weeks in a community centers after-school program.
Implementation
Please refer to the weekly activities (such as Week 1 Session 1 in the left sidebar and Resources from the sections below) for detailed information on how to use this project either in a classroom or an informal setting such as in community centers' after-school programs. The twice weekly sessions were originally designed to be 90 minutes in length, including a 10 minute break in the middle of the session. See photos of prior implementations on the projects' photo pages.
Week 2
Session 1
Questions
How do I design a bridge and what needs to be considered when designing a bridge?
What forces affect a bridge’s strength?
Goal
To understand the design process
To understand the theoretical foundation of a functional bridge
Activities
Research bridge engineering design process
Resources
Research about bridges
Reading activities
Outcomes
Keep journal
Present design process
Session 2
Questions
What does a successful bridge model look like?
Goal
To design a bridge.
Activities
Bridge demonstration activity
Resources
Readings
K'NEX
Worksheet 1
EV3 Software
Outcomes
Keep journal
Present design process
How can we build a bridge for the Boise River that is strong enough to resist earthquake forces?
Entry Event 5 minutes
A teacher begins the session by asking “What are the four major types of bridges?” PAUSEs, allow the learners to share their recollections. The teacher should review the four types of bridges: Arch, Beam, Cable, and Suspension and then asks “How do engineers design bridges?” PAUSEs for students responses and opinions, before showing a video about a bridge engineer who explains the basics of bridge design: PAUSEs and asks “What are some of the decisions that you think are important for bridge design?” Teacher encourages students to use the scientific vocabulary in their responses.
Teacher Models Bridge Building Interactive Media 10 minutes Use computer lab if WiFi is poor
The teacher introduces an educational simulator, Bridge-Builder (This site is blocked by Boise School District for the students' account. However the teacher's account can access the site. It is recommended that the teacher log the students in with the teachers' account ahead of time for each student). This game has different levels that require the user to build a bridge, using “lines” and “cables” and a set a budget that varies at each level. A truck needs to cross the bridge, therefore, the user’s design must be able to hold the truck as it crosses a divide.
The teacher needs to prepare for this simulation by experiencing the simulation before this session. The teacher demonstrates how to design a bridge for the first three levels (Possible solutions for the first three levels are included below). Once the students are assembled around the teacher’s computer screen, the teacher demonstrates how bridges are built. At the teacher's discretion, the students may offer suggestions to the bridge’s design. Some basic procedures include:
The game should be played on “full screen” (the option is in the bottom right corner)
In the game, “Lines” cost $200 per small grid box ($1,000 for a large grid box), and can stretch up to 5 small gridlines per line
“Cables” cost $100 per small grid box ($500 for a large grid box), and can stretch up to 14 small gridlines per cable
Options to add lines and cables, delete these items, move around the screen, undo a purchase, and recycle the entire current bridge project are in the right sidebar
Options to move the screen’s focus, zoom in, zoom out are in the bottom right bar
The sound effects and music can be very distracting, and muting play is encouraged
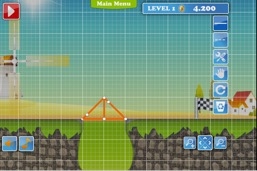
Level 1
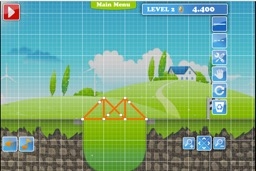
Level 2
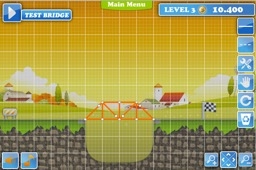
Level 3
Students Simulation of Bridge Building Interactive Media 15 minutes
The teacher guides the students to consider the process for building a bridge in the real world. Unlike the simulation, there may be many factors that can affect a bridge’s strength and performance. To learn more about the foundations of a strong bridge, the students independently research the bridge design considerations and take notes in their notebooks including important considerations of bridge building. Given the direction to visit at least three resources and record findings of the research, the students work in small group of 2 or 3 to research the design considerations engineers take before constructing their bridges. Please direct students to use Week 2 Worksheet to guide their inquiry.
Resources
PBS - Building Big Shape Lab - How Does a Bridge Work? You Can Experiment with Different Shapes and Forces in this Big Lab (Please direct students to experiment with at least the Force and Shape Tabs)
Bridges and Forces 2: Beams and Columns (Please pay attention to the highlighted text)
Stress, Strain, Stiffness, and Young's Modulus Please pay attention to the highlighted text)
Bridge Basics: Bridge Basics: A Spotter’s Guide to Bridge Design
Students Presentation 10 minutes
Students will present their research related to how bridges work and how they are built based on the set of questions and resources they researched.
End of Session Reflection and Debriefing 5-10 minutes
Teacher briefly explains the computational thinking (CT) skill embedded in the Problem Solving Process Diagram. Using the problem solving process diagram, the teacher will ask students to identify what kind of problem solving skills/process/computational thinking they used in this session and explain how they used it. The following are some sample questions that can guide the debrief.
What did I learn today?
What problem solving skills/processes or CT components in this diagram did I use today?
How did I use the problem solving skills/processes/CT components?
How can we build a bridge for the Boise River that is strong enough to resist earthquake forces?
Introduction to K'nex Set 30 minutes
A teacher opens the session, “Next week, we will be creating our own bridges using these Knex pieces. Has anyone ever used these before? Let’s take a look at how one boy used these pieces to create a life-size bridge. Our bridges won’t be quite this big, but this video might give you some ideas on how to begin your bridge designs today". Teacher proceeds to show highlighting a large Knex bridge. After the video, the teacher continues to let the students explore the Knex set and get familiar with different parts. The students are encouraged to build a simple bridge (the Chesapeake Bridge) if time permits, as a whole group with each student, or pairs of students working on different parts.
Resources
A K'Nex set
Building instructions: Book 1 for Chesapeake Bridge (pages 4 - 9)
Demonstration on Bridge Building 30 minutes
After students played with Knex set/parts, as a group, the students review Reader 5: Making Strong Structures. Suggested approaches: The teacher can ask for volunteers to read some sections out loud, as the other students follow along. Or divide students into a group of two or three to examine a certain section or shape in Reader 5. For each “Figure”, the student/group demonstrates, with teacher facilitation as needed, by modeling the design in the figure either using Knex pieces (depending on the Figure) or paper. Students comment on the strengths and weaknesses of these design. Reader 5 has instructions for both the teacher and the students on how to approach each specific situation. As each Figure is demonstrated, example questions can be asked such as: How do you think the paper will hold up to stress? Why is it important that bridges hold up under stressful conditions? and What will happen if they are weak? PAUSEs to allow the students time to answer and allow students to share their ideas.
After the students completed the demonstration with Reader 5, direct students to Skill Builder Challenge 5C (pp. 96-98) to investigate the cute figure (highlighted). Students can work in small groups of 2 to 3.
Resources
Printed Reader 5 "Making Strong Structures" for each learner (or to share) (Pay attention to the highlights & how compression and tension forces work in different structures)
4 pieces of draft paper per student
15 K’NEX Rods (any length)
15 K’NEX Connectors (any type)
K’NEX Set
Skill Builder Challenge 5C (pp. 96-98)
End of Session Reflection and Debriefing 5-10 minutes
Teacher briefly explains the computational thinking (CT) skill embedded in the Problem Solving Process Diagram. Using the problem solving process diagram, the teacher will ask students to identify what kind of problem solving skills/process/computational thinking they used in this session and explain how they used it. The following are some sample questions that can guide the debrief.
What did I learn today?
What problem solving skills/processes or CT components in this diagram did I use today?
How did I use the problem solving skills/processes/CT components?
Session 1
Session 2
Resources for Activity 1
K'NEX Set
Book 1 for Chesapeake Bridge (p. 4-9)
Resources for Activity 2
Reader 5: Making Strong Structures
1-2 pieces of draft paper per student
Pencils
15 K’NEX Rods (any length)
15 K’NEX Connectors (any type)