Project 3 How can we make sand stand tall?
A Project-based STEM+Computing Inquiry
About
This project was supported by the National Science Foundation (NSF) under Grant Number 1640228. Any opinions, findings, conclusions, or recommendations expressed in this project are those of the author(s) and do not necessarily reflect the views of the National Science Foundation. If you have any questions, please contact Dr. Dazhi Yang at dazhiyang@boisestate.edu or use our Contact Form.
Description
This project-based scientific inquiry project: How can we make sand stand tall? Lorem ipsum dolor sit amet, consectetur adipisicing elit, sed do eiusmod tempor incididunt ut labore et dolore magna aliqua. Ut enim ad minim veniam, quis nostrud exercitation ullamco laboris nisi ut aliquip ex ea commodo consequat. Duis aute irure dolor in reprehenderit in voluptate velit esse cillum dolore eu fugiat nulla pariatur. Excepteur sint occaecat cupidatat non proident, sunt in culpa qui officia deserunt mollit anim id est laborum.
Implementation
Please refer to the weekly activities (such as Week 1 Session 1 in the left sidebar and Resources from the sections below) for detailed information on how to use this project either in a classroom or an informal setting such as in community centers' after-school programs. The twice weekly sessions were originally designed to be 90 minutes in length, including a 10 minute break in the middle of the session. See photos of prior implementations on the projects' photo pages.
Week 2
Session 1
Questions
What are the characteristics of sand?
What is reinforced sand?
Activities
Team-building activity
Introduction of the Problem Solving Process
Demo of reinforced sand
Whole group discussion
Resources
Problem Solving Process
Types of Soil Worksheet
Sifting Soils Worksheet
Outcomes
Identify different types of soils based on engineering classification: gravel, sand, silt and clay
Identify differences in terms of their sizes and shapes (round versus angular)
Session 2
Questions
What are the characteristics of sand?
What is reinforced sand?
What is the purpose of soil reinforcement?
Activities
Team-building activity
Introduction of the Problem Solving Process
Demo of reinforced sand
Whole group discussion
Resources
Problem Solving Process
Shape of Sand Particles Worksheet
Outcomes
Explain what soil reinforcement is
How can we make sand stand tall?
Entry Event 10 minutes
The facilitator could start with the following questions:
What is soil? What does it look like?
How do we use soil?
What does it do?
Where soil is found?
Introduce four types of soil that are placed in four different containers: gravels, sands, silts and clays. Ask students to observe four types of soils in small groups.
Play with Mr. Dirt Small-group Hands-on Scientific Inquiry 15 minutes Part 1
The facilitator can ask, “how big is a millimeter?” “How big is 4 millimeters?” – indicating we could easily identify gravel from the rest of other soils. “What about sand?” “How big is sand?” “How big is 0.1mm?” and “how big is 0.05mm?” Here, the facilitator can encourage students to describe the size of sand in fraction language. For example, if we know big is one millimeter, then 0.1mm is tenth of 1 mm, and 0.01 is one hundredth of 1mm, etc.
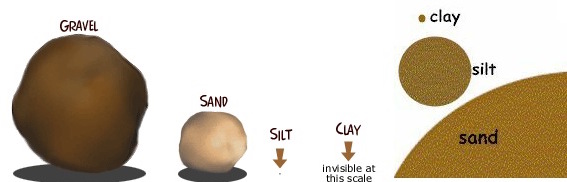
Gravel > 4mm; Sand- 0.07 to 4mm; Silt – 0.002 to 0.075 mm; and Clay < 0.002.
Image Credit: http://earthsci8.wikispaces.com
The facilitator can ask, “Let’s see what else we can observe about these different types of soil.” Review words that students could use to describe their observations. It might be worth considering questions such as:
What words do we use to describe smell of an object?
What mathematical words could we use to describe the size of an object?
What words do we use to describe how we feel when we touch an object?
Resources
Six sets of four types of soil (gravel, sand, silt, clay)
Containers or cups
Six sets of four types of soil (gravel, sand, silt, clay)
gloves for each student
Each group (6 students per group) will have a set of four containers that have types of soils. Ask students to document observable physical characteristics of the soils in a worksheet (below)
Describe of color, smell, size of each type of soil
Test to see if each type of soil can stand by itself
Whole Group Discussion 15 minutes
The facilitator could ask following questions to guide student thinking on analyzing their observations and sharing it with the whole group:
What did you observe? Color? Smell? Size? Shapes?
How do we describe the sizes of soils? How do we measure the sizes of different types of soils?
What are different shapes of soils? Can we see and describe them?
Which types of soil can stand? Which ones can’t?
What the physical properties (that we discovered) do they (soils) share in common?
What are the differences?
Sifting Soils Small-group Hands-on Scientific Inquiry 30 minutes Part 2
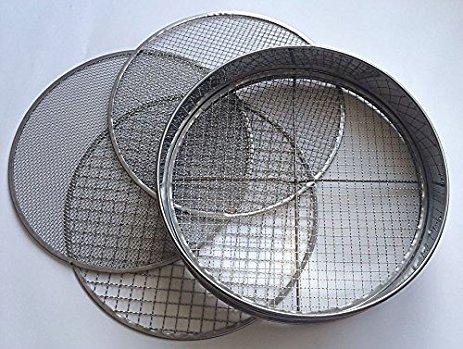
The facilitator will need to introduce the method of “sift”, and show students how to use sift to get some measurements of the sizes of soils including gravels, sands, clay, and silts. Review math – quantitative reasoning and different measurement system, metric (meters, centimeter, etc.) and U.S. (feet, inches, etc.) How big is 1 cm? 1 mm? 0.1mm? Ask, “What kinds of tool do we use to have linear measure?” “What kinds of tools do we have to measure the size of particles?”
Resources
6 sets of sieves (each includes one 4.75mm sift and 0.075mm sift)
A mixture of soils in different containers (1 cup each small group of 3 students)
Gloves for every student (check if students are allergic to neoprene, also prepare nitrile gloves)
Rulers that show mm for measuring
Sifting Soils Worksheet: testing physical observations of each soil type using sieves
Whole Group Discussion 10 minutes
The facilitator could ask following questions to guide student thinking on analyzing their observations and sharing it with the whole group:
What did you observe on the sizes of the soils?
How do we describe the sizes of soils?
How do we measure the sizes of different types of soils?
Which type of soils has the biggest size? Which one has the smallest size?
End of Session Reflection and Debriefing 5-10 minutes will be recorded
What did I learn today?
What worked well?
What didn’t work well?
What can I/we do differently next time?
Do you have anything else to share?
How can we make sand stand tall?
Entry Event 10 minutes
The facilitator would first review what they did in the previous session about the “size of the soils” and ways they used sifts to differentiate different sizes of soils. The facilitator could start with the following questions:
What are types of soils? How are they different from each other?
How do we measure the sizes of different types of soils?
How do we describe them? For example?
Which type of soils has biggest size? Which one has the smallest?
How can we align four types of soils from biggest to smallest?
The facilitator could start the conversations on sands by asking, “Where can we find sands?” “Have you ever hold sands before?” If so, how does it feel? What do we do with sands?
Shapes of Sand Particles Small-group Hands-on Scientific Inquiry 30 minutes Part 1
Come up with three types of sand (coarse, medium and fine)
Each group (3 students per group) will be given a set of sand samples including (coarse, medium and fine). Ask students to document observable physical characteristics of the sands in worksheet (Sand sizes & shapes):
Describe of shape and size of each type of sands
Test and hypothesize if each type of sands can stand by itself
Compare and contrast the similarity and differences of each type of sands
Resources
6 sets of three different types of sand samples (coarse, medium, fine)
18 pairs of gloves
Shape of Sand Particles (without Microscope) Worksheet (Sand Sizes & Shapes)
Whole Group Discussion 10 minutes Part 1
The facilitator could ask following questions to guide student thinking on analyzing their observations and sharing it with the whole group:
What did you observe? Color? Smell? Size? Shapes?
How do we describe the sizes and shapes of sands? How do we measure the sizes and shapes of different types of sands?
What are different shapes of sands? Can we see and describe them?
Which types of sands can stand? Which ones can’t?
Knowing the classification of the sizes of soils from previous session, and for Sand is range from 0.07 to 4mm. The facilitator can ask, “How big is a millimeter?” “ How big is 4 millimeters?” – indicating we could easily identify some sands that has size close to 4mm. “What about sands that are small in sizes?” Here, the facilitator can encourage students to describe the size of sand in fraction language. For example, if we know big is one millimeter, then 0.1mm is tenth of 1 mm, and 0.01 is one hundredth of 1mm, etc. Use fraction language to explain different types of sands. “What are the shapes of sands?”
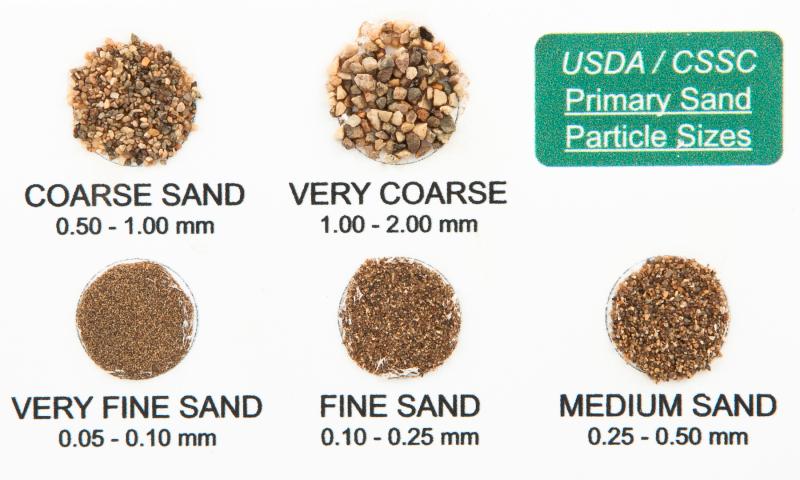
Image Credit: https://dynamicmonitors.com/product/sand-size-card/
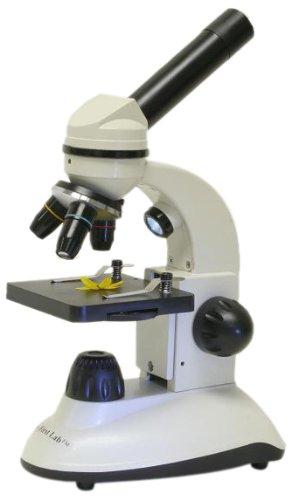
Microscope Activity Small-group Hands-on Scientific Inquiry Part 2
The facilitator will introduce the method of using microscopes to observe the shapes/sizes of sands, and ways how to use microscopes by providing students with procedures to use microscopes. Facilitators will show students how to use the microscope and then discuss with students about sharing the opportunity of using microscope as part of teamwork skill.
Review math – quantitative reasoning and different measurement system, metric (meters, centimeter, etc.) and U.S. (feet, inches, etc.) How big is 1 cm? 1 mm? 0.1mm? Ask, “What kinds of tools do we use to have linear measure?” “What kinds of tools to observe small size of particles?”
Whole Group Discussion 10 minutes Part 2
The facilitator could ask following questions to guide student thinking on analyzing their observations and sharing it with the whole group:
What did you observe? What shapes of sands are there?
How do we describe the sizes and shapes of sands? How do we measure the sizes and shapes of different types of sands?
What are different shapes of sands?
How can we categorize the shapes of sand particles?
Why is it important to know the shapes of particles?
What is more important to make sand strong? Size or shape? Explain your hypothesis
On a large poster paper, students will create a chart (binary table) regarding the sand sizes and shapes. The facilitator will record the students’ hypotheses. Facilitator could ask following questions to guide students thinking in completing the task:
What is your plan to organize what you have observed?
What information do you have so far? and what are they?
What are the sand sizes? What are the sand shapes? And how do you organize them so that other people can understand?
What information could you use from the worksheet?
Resources
3 microscopes - One for each group of six students
6 sets of sand samples of each coarse, medium, and fine with different shapes based on their sizes
Grid paper to document the shapes of the sands
Shape of Sand Particles (with Microscope)Worksheet
End of Session Reflection and Debriefing 5-10 minutes will be recorded
What did I learn today?
What worked well?
What didn’t work well?
What can I/we do differently next time?
Do you have anything else to share?
Session 1
3 microscopes - One for each group of six students
6 sets of sand samples of each coarse, medium, and fine with different shapes based on their sizes
Grid paper to document the shapes of the sands
Session 2
Shapes of Sand Particles (without microscope) Worksheet
Shapes of Sand Particles (with microscope) Worksheet
Six sets of four types of soil (gravel, sand, silt, clay)
Containers or cups
Six sets of four types of soil (gravel, sand, silt, clay)
Gloves for each student
Each group (6 students per group) will have a set of four containers that have types of soils. Ask students to document observable physical characteristics of the soils in a worksheet (below)
Describe of color, smell, size of each type of soil
Test to see if each type of soil can stand by itself