Project 3 How can we make sand stand tall?
A Project-based STEM+Computing Inquiry
About
This project was supported by the National Science Foundation (NSF) under Grant Number 1640228. Any opinions, findings, conclusions, or recommendations expressed in this project are those of the author(s) and do not necessarily reflect the views of the National Science Foundation. If you have any questions, please contact Dr. Dazhi Yang at dazhiyang@boisestate.edu or use our Contact Form.
Description
This project-based scientific inquiry project: How can we make sand stand tall? Lorem ipsum dolor sit amet, consectetur adipisicing elit, sed do eiusmod tempor incididunt ut labore et dolore magna aliqua. Ut enim ad minim veniam, quis nostrud exercitation ullamco laboris nisi ut aliquip ex ea commodo consequat. Duis aute irure dolor in reprehenderit in voluptate velit esse cillum dolore eu fugiat nulla pariatur. Excepteur sint occaecat cupidatat non proident, sunt in culpa qui officia deserunt mollit anim id est laborum.
Implementation
Please refer to the weekly activities (such as Week 1 Session 1 in the left sidebar and Resources from the sections below) for detailed information on how to use this project either in a classroom or an informal setting such as in community centers' after-school programs. The twice weekly sessions were originally designed to be 90 minutes in length, including a 10 minute break in the middle of the session. See photos of prior implementations on the projects' photo pages.
Week 6
Session 1
Questions
What are the positive/negative aspects of using plastic sticks as reinforcement materials?
Activities
Student Group Research
Student Experiments
Resources
Problem Solving Process diagram
Plastic Sticks Worksheet
Outcomes
Learners will test how to best use plastic sticks in reinforcing soil.
Session 2
Questions
What are the positive and negative aspects of using cloth items as reinforcement materials?
Activities
Student Group Research
Student Experiments
Resources
Problem Solving Process Diagram
Cloth Worksheet
Outcomes
Learners will test how to best use cloth in reinforcing soil.
How can we make sand stand tall?
Entry Event - Competition Announcement 10-15 minutes
The facilitator will introduce the competition to the students. Students will use the box shown in Figure 1 below. Facilitator will pass around a box for students to review. The goal of the competition is to be able to open the front face of this box and have the soil stand without any support while carrying load. Students can use any or all of the four different reinforcing materials provided to them.
The students will not only consider materials, but should also consider costs. The facilitator will explain that students can mix and match reinforcements provided every group will be given the same sand. After the wall is complete the students will remove the front face of the box and see if there is any deflection. After that a load if 5-kg will be placed on the soil surface and again observed for deflection (such as bulging in the sand or sand falling off). If there is no deflection on the open face the wall passes the test. The wall that satisfies these requirements and costs the lowest wins!
The facilitator will ask students to carefully pass around a 5-kg weight so that students can get a sense of how much weight this is.
The facilitator will ask the students if they have any questions and address them as needed.
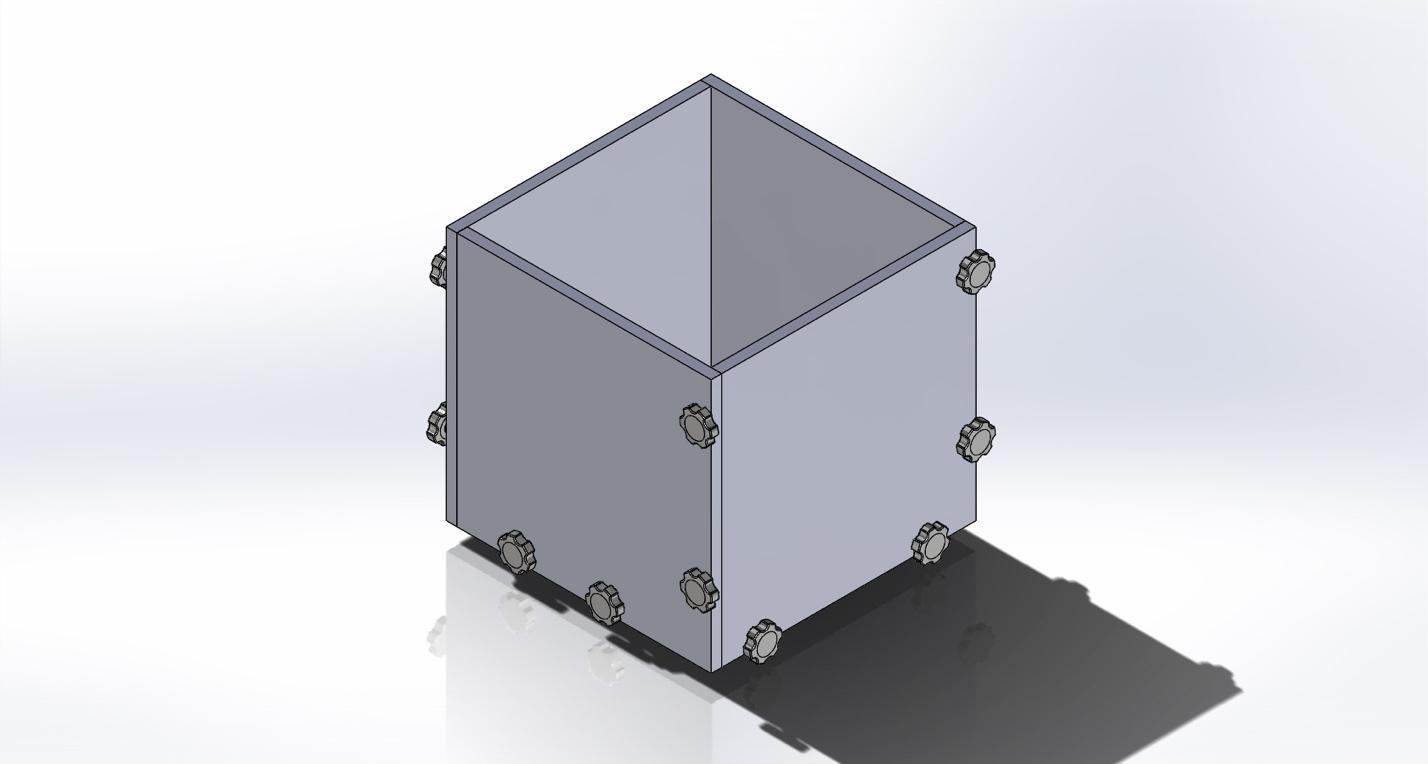
Figure 1. Schematic of the box to be used to prepare the soil
| Reinforcement Type | Unit | Cost per Unit |
|---|---|---|
| Plastic Sticks | 12" Long | $2 |
| Cloth | 1 Sq. Feet | $5 |
| Wire Mesh | 1 Sq. Feet | $10 |
| Paper | 1 Sq. Feet | $1 |
Resources
Plastic Sticks
Cloth
Wire Meshes
Paper
Box
5kg Weight
Sand
Student Group Research 25 minutes
Students should be broken into groups of three. This will be the team they work in and compete with for the remainder of the project. Once split into groups, students should review the design challenge details and the rules of the competition. Each group should make sure that all members of their team understand the rules of the competition and what needs to be accomplished to get to that point.
Note: Students will have the opportunity to mix-and-match materials in a future session, but today’s session will focus exclusively on the plastic stick.
During this phase, it is up to each team to look at the resources available – in this session, plastic sticks – and to plan how best they can be used to complete tasks within the time available. Good planning is the key to any successful project. Every person on the team has a valid contribution to make and every idea should be evaluated on its merits. Students should occasionally check with the job specifications to make sure their ideas are aligned with the learning targets.
Students may use the worksheet above, large butcher paper, or their own journals to take notes, sketch ideas, write down observations, etc.
10 minute break
Student Experiments 35 minutes
Students will take their initial plans and experiment with the plastic sticks as a reinforcement for the soil. Each group will work together to test different amounts, positions, and layers of plastic sticks. While constructing, students should not forget to compact the soil. If you do not compact, the reinforcement effects are minimal. Students should be encouraged to continue testing different methods. Students will want to take good notes on what worked during their experimentation - and what didn’t. Students should also take notes on the costs associated with their build for future comparison. Students should be sure to make note of what worked best and how much it cost for future comparisons/considerations.
End of Session Reflection and Debriefing 5-10 minutes
Teacher briefly explains the computational thinking (CT) skill embedded in the Problem Solving Process Diagram. Using the problem solving process diagram, the teacher will ask students to identify what kind of problem solving skills/process/computational thinking they used in this session and explain how they used it. The following are some sample questions that can guide the debrief.
What did I learn today?
What problem solving skills/processes or CT components in this diagram did I use today?
How did I use the problem solving skills/processes/CT components?
How can we make sand stand tall?
Entry Event 10 minutes
The competition is coming soon! Students will gather in their small groups and pick a team name and color. The facilitator will allow the students several minutes to discuss their ideas and each group will share their decisions. The facilitator may need to offer some examples such as: The Silver Snakes, The Green Jedis, The Blue Boise Broncs, etc. If two teams select the same color, students will be asked to ro-sham-bo (rock, paper, scissors) to see who wins the color right. All teams and colors and names will be written down somewhere in the classroom for reference. This is just a short, fun team-building activity to get students invested and excited for the future competition.
Student Group Research 5 minutes
Once split into their groups, students should review the design challenge details and the rules of the competition. Each group should make sure that all members of their team understand what has to be accomplished and the rules of the competition. If unsure ask a Boise State staff member to explain.
Note: Students will have the opportunity to mix-and-match materials in a future session, but today’s session will focus exclusively on the plastic stick.
During this phase, it is up to each team to look at the resources available – in this session, cloth – and to plan how best they can be used to complete tasks within the time available. Good planning is the key to any successful project. Every person on the team has a valid contribution to make and every idea should be evaluated on its merits. Students should occasionally check with the job specifications to make sure their ideas are aligned with the learning targets.
Students may use the cloth worksheet, large butcher paper, or their own journals to take notes, sketch ideas, write down observations, etc.
| Reinforcement Type | Unit | Cost per Unit |
|---|---|---|
| Plastic Sticks | 12" Long | $2 |
| Cloth | 1 Sq. Feet | $5 |
| Wire Mesh | 1 Sq. Feet | $10 |
| Paper | 1 Sq. Feet | $1 |
Resources
Cloth
Box
5kg Weight
Sand
10 minute break
Student Experiments 35 minutes
Students will take their initial plans and experiment with the cloth as a reinforcement for the soil. Each group will work together to test different amounts, positions, and layers of cloth. While constructing, students should not forget to compact the soil. If you do not compact, the reinforcement effects are minimal. Students should be encouraged to continue testing different methods. Students will want to take good notes on what worked during their experimentation - and what didn’t. Students should also take notes on the costs associated with their build for future comparison. Students should be sure to make note of what worked best and how much it cost for future comparisons/considerations.
End of Session Reflection and Debriefing 5-10 minutes will be recorded
Teacher briefly explains the computational thinking (CT) skill embedded in the Problem Solving Process Diagram. Using the problem solving process diagram, the teacher will ask students to identify what kind of problem solving skills/process/computational thinking they used in this session and explain how they used it. The following are some sample questions that can guide the debrief.
What did I learn today?
What worked well?
What didn't work well?
What can I/we do differently next time?
Do you have anything more to share?