Project 4 How do airplanes fly?

A Project-based STEM+Computing Inquiry
About
This project was supported by the National Science Foundation (NSF) under Grant Number 1640228. Any opinions, findings, conclusions, or recommendations expressed in this project are those of the author(s) and do not necessarily reflect the views of the National Science Foundation. If you have any questions, please contact Dr. Dazhi Yang at dazhiyang@boisestate.edu or use our Contact Form.
Description
This project-based scientific inquiry project: How Do Airplanes Fly? is centered on airplane design and flight control components. It requires students to apply knowledge from physics, mathematics, engineering, technology and computing to solve problems. In this project, students work in small groups to explore and research different types of airplanes, key concepts of why an airplane can fly, turn and be stable, flight control components, and the associated physics and engineering principles. Then, students design a type of an airplane and test their design.
Implementation
Please refer to the weekly activities (such as Week 1 Session 1 in the left sidebar and Resources from the sections below) for detailed information on how to use this project either in a classroom or an informal setting such as in community centers' after-school programs. The twice weekly sessions were originally designed to be 90 minutes in length, including a 10 minute break in the middle of the session. See photos of prior implementations on the projects' photo pages.
Week 4
Session 1
Questions
What does Pitch, Roll, Yaw each mean?
How can we control them on an airplane?
Goal
To understand the definition of pitch, roll, and yaw
To understand how pitch, roll, and yaw can be controlled on an airplane
To understand the problem that drives the project
To know team members and prepare for team work
Activities
Continued gliders from last session
Have students fly the Cessna (basic), then the Wingman, or Acrobatics
Learn about the problem solving process
Resources
Glider instructions
Outcomes
Journal Notes
Data
Session 2
Questions
How do we measure the performance of a wing using a wind tunnel?
Goal
To understand how a wind tunnel works and why it is used
To be able to test their planes using a wind tunnel
Activities
Wind Tunnel videos
Test styrofoam gliders in wind tunnel and record data
Resources
Wind Tunnel
Videos
Outcomes
Journal Notes
Wind Tunnel Data
How do airplanes fly?
Wing Shape Small-group Hands-on Scientific Inquiry
How does the shape of the wing affect drag and lift? Skinny wing? Fat wing? Double wing? Long wing? Facilitate discussions on what each of these shapes will do to lift and drag. Ask students to create hypotheses on this question.
Research answers to see if hypotheses were correct.
The facilitator can use this resource of airplane designs vs. functions to help discuss the airplane shape and design vs. desired function.
Resources for research wing shape activity:
FoilSim Small-group Hands-on Scientific Inquiry Use your staff account to use this simulation
For this activity, students will use the elementary version of NASA’s FoilSim software (Please use the elementary version - lower link to download)
Using FoilSim, find the wing with the best lift-to-drag ratio for a speed of 100 mph, a wing area of 150 sq ft, a weight of 2500 lbs, and an altitude of 2000 ft. The students will need to change Angle, Camber (curve of the wing), and Thickness. They will need to calculate the ratio of each test point. (Try to get the students to think of a logical way to approach this problem – not just randomly change variables.)
First have a discussion on how to solve this problem. There are three variables (three things that can be changed). When one is changed it can affect another. So the students need a plan to figure a smart way to attack this problem (For example: keeping one constant, while optimizing the other two. Then change the one that was constant, while keeping the other two constant and optimize it, and then repeat if necessary).
Use the FoilSim Recording Sheet for recording the simulation results
Angle of Attack and Lift-to-Drag Ratio Small-group Hands-on Scientific Inquiry Extra Activity
This activity was also included in week 2 lesson 2, but it is relevant to this session as well if students didn’t do it before. How Wings Work
Another option for an extra activity is to change the initial parameters for the FoilSim problem. For example, set a speed of 400 mph, 200 sq ft, and an altitude of 10,000 ft, and solve for a wing with the best lift over drag ratio. Then the students can see the difference in the wings.
Resources
Problem Solving Process Diagram
End of Session Reflection and Debriefing 5-10 minutes
Teacher briefly explains the computational thinking (CT) skill embedded in the Problem Solving Process Diagram. Using the problem solving process diagram, the teacher will ask students to identify what kind of problem solving skills/process/computational thinking they used in this session and explain how they used it. The following are some sample questions that can guide the debrief.
What did I learn today?
What problem solving skills/processes or CT components in this diagram did I use today?
How did I use the problem solving skills/processes/CT components?
How do airplanes fly?
How do propellers help an airplane fly? Small-group Hands-on Scientific Inquiry Finish last activity if needed
Facilitator opens the activity with discussions with students: “What happens if the airplane is not straight and level? How does this affect the four forces?” Show with vectors. (Use an airplane with vectors pointing out, with the gravity vector on a hook – will always point to Earth) “This can show that if the airplane is going straight up, the gravity and drag are added together and they go against the thrust. In a turn, some of the lift helps the airplane move sideways (lift vector points up and towards a side), but we need more lift to counter the same amount of weight.”
Now add a propeller to the first styrofoam airplane. Now you have thrust. Test the airplane to see how far it can fly with 20 turns of the propeller (whatever number seems appropriate, just needs to be a constant). Does the airplane need to have the weight adjusted? Does the angle of attack make a difference? Record your test results. Which angle of attack flies the farthest?
Watch the video . Stop the video at 35 seconds and let the students answer the question on why the vehicle with the propeller moved. Continue the video. Stop the video at 1:16 and let the students answer the question. Continue the video. Stop the video at 2:28 and let the students answer the question. Continue the video. Stop the video at 2:58 and let the students answer the question. Continue the video. Then watch to see how a propeller works on a plane.
The facilitators ask, “what did we learn from these videos?” The students take notes in their journals as the teacher records their answers on the board. Discuss. Then tell the students, “for the next two sessions we will be making the rubber band powered propeller airplanes.” Use the following resource directions and have the students start building their propellers. Once the airplane has been assembled, try to find the best spot (forward and aft on the fuselage) for the wing by throwing it as a glider. Once that has been determined, wind the propeller, making sure it is being wound in the correct direction (looking at the front of the airplane, it should be wound in a clockwise direction). Then, hold the propeller and the airplane and gently toss the airplane and let go of the propeller at the same time. Work on fine turning the path of the airplane by changing the position of the wing. Also, if the airplane is always turning to the left (it most likely will due to the torque of the propeller), one may create a little rudder to counteract this force. To do this, gently bend the back of the vertical stabilizer (where the rudder would be) to the direction you want your airplane to go (to the right).
Steps to build a propeller airplane
1. Using the propeller airplane template, cut out wing and tail pieces (using the big foam tray for the wing; use the small foam tray for tail pieces).
2. Smooth and round edges with the sander.
3. Attach the propeller to the front of balsa wood fuselage.
4. Attach the large rubber band to the propeller and “hook” on the fuselage.
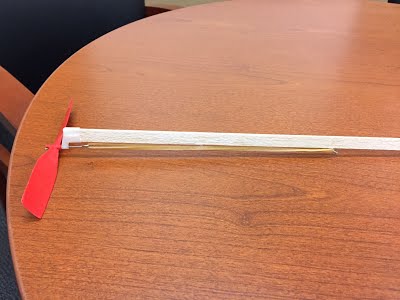
5. Using a small rubber band and WAD, attach the wing to the fuselage.

6. Insert the horizontal stabilizer into the vertical stabilizer (put the tail together).
7. Insert the tail into the slot on the back of the fuselage, tape the back end into place to keep it secure.
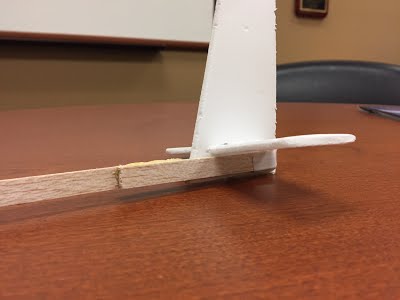
Once the airplane has been assembled, try to find the best spot (forward and aft on the fuselage) for the wing by throwing it as a glider. Once that has been determined, wind the propeller, making sure it is being wound in the correct direction (looking at the front of the airplane, it should be wound in a clockwise direction). Then, hold the propeller and the airplane and gently toss the airplane and let go of the propeller at the same time. Work on fine turning the path of the airplane by changing the position of the wing. Also, if the airplane is always turning to the left (it most likely will due to the torque of the propeller), one may create a little rudder to counteract this force. To do this, gently bend the back of the vertical stabilizer (where the rudder would be) to the direction you want your airplane to go (to the right).
Resources
Amy's Aviation: How a propeller works
Problem Solving Process Diagram
Mr. Wizard: How a propeller works
Rubber Band Airplanes: Make It
Propeller
Balsa Wood Fuselage
Large Foam Tray
Plastic Knife
Large Rubber Band
Small Rubber Band
Wing Attachment Device (WAD)
Sander
End of Session Reflection and Debriefing 5-10 minutes
Teacher briefly explains the computational thinking (CT) skill embedded in the Problem Solving Process Diagram. Using the problem solving process diagram, the teacher will ask students to identify what kind of problem solving skills/process/computational thinking they used in this session and explain how they used it. The following are some sample questions that can guide the debrief.
What did I learn today?
What problem solving skills/processes or CT components in this diagram did I use today?
How did I use the problem solving skills/processes/CT components?
Session 2
Amy's Aviation: How a propeller works
Problem Solving Process Diagram
Mr. Wizard: How a propeller works
Rubber Band Airplanes: Make It
Propeller
Balsa Wood Fuselage
Large Foam Tray
Plastic Knife
Large Rubber Band
Small Rubber Band
Wing Attachment Device (WAD)
Sander